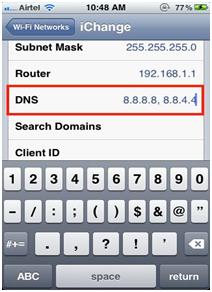
iPhone has many features and utilities for engaging the user and providing the facilities you need to be in hand. One of the salient features is the wifi technology. However, if the connection speed is slow especially when you have shifted from one network to the other then try manually setting the DNS server. This for sure speeds up the browsing speed and response time from your wireless network. Following are the steps for manual settings of the DNS server:
- First Open Settings from the menu
- Select “Wi-Fi” option and tap the blue arrow showing the wi-fi network name you are connected to
- Tap DNS option and enter the number of ip address to which you want to connect
Tips:
To get best possible results if you are using MAC OS X, Windows, or Linux you can get an application naming Find the Fastest DNS server for your location. Here are two options which are typically available and are very fast and reliable:
Google DNS servers: 8.8.8.8 and 8.8.4.4
Open DNS servers: 208.67.222.222 and 208.67.220.220
This tip surely works for older devices like iphone 2G and 3G but it works fine for new updated versions of iphone like 4, 4S, ipad, and ipad 2.


