Many people dont get used to Mac and so they decide to install Windows Xp and thanks to the new feature of Boot Camp introduced by Apple, a free downloadthat lets you repartition your Intel-based Mac’s drive and install Windows XP as an alternative operating system. So you can run Windows applications at native speed. Windows applications have full access to multiple processors and multiple cores, accelerated 3D graphics, high-speed connections like USB, FireWire, Wi-Fi, and GigabitEthernet.
OK Lets start :
1. The first thing you need to do is Download the latest version of Boot Camp from apple site. Install the Boot Camp and during installation after you authenticate, it might as you to upgrade your firmware but thats not a big deal as you can Download the latest firmware from Apple site. After that install Boot Camp and run it.
2. Next things you should do is run the Boot Camp Assistant and burn a Macintosh Drivers CD which contains important device drivers for Windows XP so it can access the various hardware parts of the Mac. So Burn Macintosh Drivers CD now and click Continue.
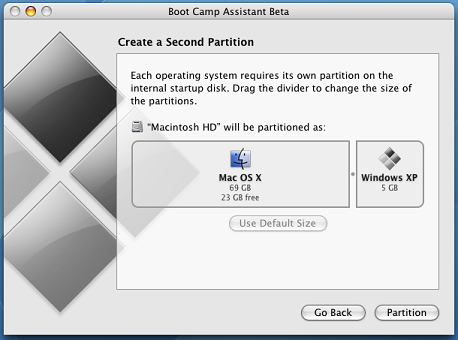
3. Now that you are done with the Macintosh driver CD, you should partition the Harddisk for Windows Xp. By Default, Mac gives only 5 gb for the installation of Windows XP as shown. But you can increase it if you want to use XP as your operating system.
You can change the size by dragging the vertical bar between the two until you get the size you want and click Partition.
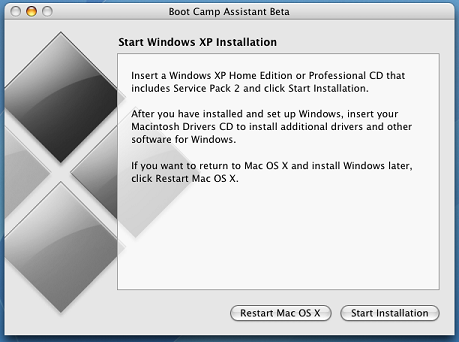
4. Now after you have partitioned, insert Windows Xp CD and wait for Mac to recognize it and then Click Start Installation and it will start the Installation of Windows Xp.
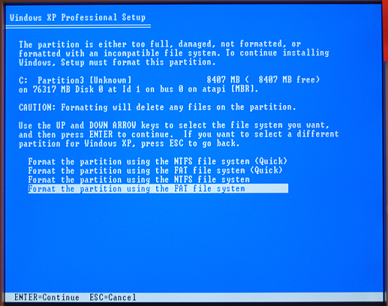
5. After that the normal windows Xp Installation will begin just hit Enter to continue and then select the partition . You must be careful here and choose the correct partition you made. For instance if you made a partition disk of lets say 6gb, then you should see whichpartition has that space and choose the correct partition.
6. Now you need to choose the partition type. There are two types, FAT and NTFS. NTFS is new and supports large partitions while FAT cannot handle large partitions so you should select FAT and perform a Full format not the quick one.
Now after formatting, normal windows Setup will run and install Windows Xp. After the installations finishes, your system will reboot and now you should take out the Windows Xp Cd and insert Mac Drivers Cd that we burned in step 2. During installation of the drivers, it will show a Hardware Installation Window as various components of your Intel-based Macintosh haven’t passed the Microsoft Windows compatibility test but apple assures that they are safe so Click Continue Anyway. It will ask you to reboot after the installation of the drivers and then when you will reboot it will start with Windows XP  .
.
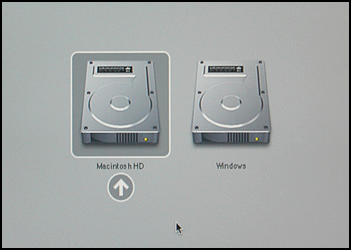
If you want to change Operating system and want to use Mac, hold down the Option key and you will be able to see both Mac and Windows and you can choose what ever you want to run from those two operating systems.
If you hold the alt key on powerup of macbook the above menu appears and you can choose between OS. Now you are good to go and chose what ever you want to run.
If you do not want to use bootcamp, you can use Parallel Desktop (not recommended). But, if you want go down this road, the video below will be helpful
[youtube]http://www.youtube.com/watch?v=vJCAwyMIxNM[/youtube]
Parallel Desktop is great to help Mac users get a more PC-like experience, however, for those on PC that are looking for a Mac OS experience, they will want to be sure to check out OneLaunch. Head on over to read our review of OneLaunch and see if it’s the right choice for your Windows customization needs.
