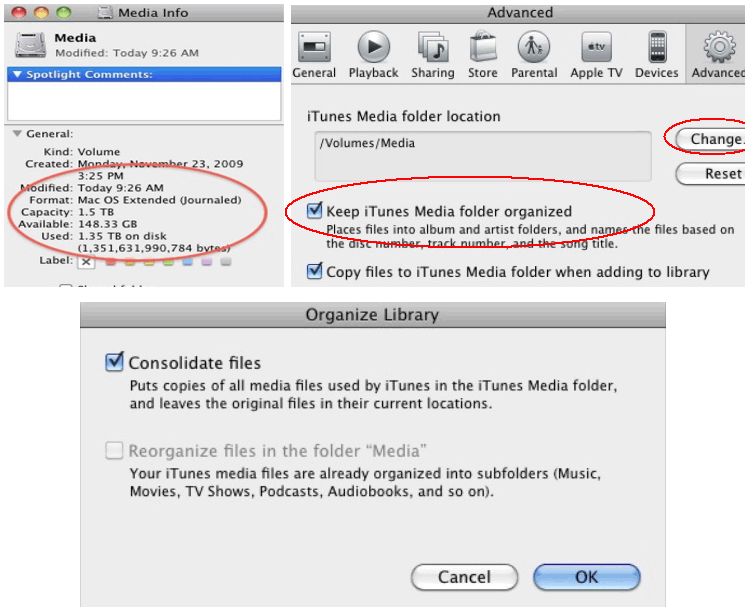
Space is a big issue for those who love movies, music, TV shows and podcasts as many times the data reaches the capacity of the drive. In this article we will discuss how to move the iTunes media folder:
- First of all you need to add hard drive to the MAC. Keep in mind the current as well as expected size of your iTunes media folder while choosing the capacity of the hard drive. Remember, the size of TV shows, movies, ripped CDs etc is far larger so your hard drive should be able to accommodate lots of data for years.
- Next, you need to configure the preferences of iTunes. For that launch iTunes and select Preferences. A new window will open. Click on ADVANCED button and select the option for ‘Keep iTunes Media Folder Organized’. Then, click on the CHANGE button and locate the hard drive you added in step 1. Click on NEW FOLDER button, enter name and click on CREATE. After that select button in the window for ‘Change iTunes Media Folder’ and click OK.
- Go to File>Library>Organize Library. Select the option for ‘Consolidate Files’ and click OK. Now iTunes will not only copy your existing iTunes media content to the new folder you created but also use it for future content.
- Quit iTunes.
- Navigate to your original iTunes Media folder and move it to desktop as a backup. Launch iTunes and play any track or video in it. If it plays without any issues then it means the folder has been moved successfully. Finally, remove the old iTunes Media folder placed on the desktop.
Below video will help you in moving iTunes Library to an External Drive:
[youtube]http://www.youtube.com/watch?v=zVCN8H8wCvc[/youtube]


